调用方式
我们先看一下Glide的用法,相信大家都会. 精彩之处在于
- 功能强大,RESTful调用
- 不用我们处理取消问题,自绑定生命周期
- 不用在Application初始化
Glide.with(TodayFragment.this)
        .load(gankDay.results.福利.get(0).getUrl())
        .centerCrop()
        .crossFade()
        .error(R.drawable.jay)
        .into(mImageView);
with是干什么的
with起到绑定生命周期的作用,这里的with可能是多种类型,Glide都帮我们复写了.with的效果主要是帮我们给当前对象绑定上生命周期.
以Fragment为调用方举例.
public static RequestManager with(Fragment fragment) {
    RequestManagerRetriever retriever = RequestManagerRetriever.get();
    return retriever.get(fragment);
}
我们去RequestManagerRetriever看看.
public RequestManager get(Fragment fragment) {
    if (fragment.getActivity() == null) {
        throw new IllegalArgumentException("You cannot start a load on a fragment before it is attached");
    }
    if (Util.isOnBackgroundThread()) {
        return get(fragment.getActivity().getApplicationContext());
    } else {
        FragmentManager fm = fragment.getChildFragmentManager();
        return supportFragmentGet(fragment.getActivity(), fm);
    }
}

RequestManager supportFragmentGet(Context context, final FragmentManager fm) {
    SupportRequestManagerFragment current = (SupportRequestManagerFragment) fm.findFragmentByTag(TAG);
    if (current == null) {
        current = pendingSupportRequestManagerFragments.get(fm);
        if (current == null) {
            current = new SupportRequestManagerFragment();
            pendingSupportRequestManagerFragments.put(fm, current);
            fm.beginTransaction().add(current, TAG).commitAllowingStateLoss();
            handler.obtainMessage(ID_REMOVE_SUPPORT_FRAGMENT_MANAGER, fm).sendToTarget();
        }
    }
    RequestManager requestManager = current.getRequestManager();
    if (requestManager == null) {
        requestManager = new RequestManager(context, current.getLifecycle());
        current.setRequestManager(requestManager);
    }
    return requestManager;
}
可以看到主要流程就是,去 FragmentManager寻找fragment,fm.findFragmentByTag(TAG);, 如果找不到,就实类化一个current = new SupportRequestManagerFragment();,并添加进去
那SupportRequestManagerFragment是什么呢?我们进去看
public class SupportRequestManagerFragment extends Fragment {
    private RequestManager requestManager;
    private final ActivityFragmentLifecycle lifecycle;

    public SupportRequestManagerFragment() {
        this(new ActivityFragmentLifecycle());
    }
    ...
}
SupportRequestManagerFragment是继承于Fragment,并实现了各个生命周期的回调,最终回调lifecycle接口.这里就实现了生命周期的监听.
ActivityFragmentLifecycle是一个观察者,里面有一个Set集合存放了LifecycleListener, 这是标准的观察者模式的写法,每次回调都会遍历集合分发事件.代码如下.
class ActivityFragmentLifecycle implements Lifecycle {
    private final Set<LifecycleListener> lifecycleListeners =
            Collections.synchronizedSet(Collections.newSetFromMap(new WeakHashMap<LifecycleListener, Boolean>()));
    private boolean isStarted;
    private boolean isDestroyed;

    @Override
    public void addListener(LifecycleListener listener) {
        lifecycleListeners.add(listener);

        if (isDestroyed) {
            listener.onDestroy();
        } else if (isStarted) {
            listener.onStart();
        } else {
            listener.onStop();
        }
    }

    void onStart() {
        isStarted = true;
        for (LifecycleListener lifecycleListener : lifecycleListeners) {
            lifecycleListener.onStart();
        }
    }

    void onStop() {
        isStarted = false;
        for (LifecycleListener lifecycleListener : lifecycleListeners) {
            lifecycleListener.onStop();
        }
    }

    void onDestroy() {
        isDestroyed = true;
        for (LifecycleListener lifecycleListener : lifecycleListeners) {
            lifecycleListener.onDestroy();
        }
    }
}
此时我们再回到RequestManagerRetriever的里面,该走下一步了,我们要返回的是RequestManager,
一样的套路,先去拿,拿不到就实类化.
RequestManager requestManager = current.getRequestManager();
if (requestManager == null) {
    requestManager = new RequestManager(context, current.getLifecycle());
    current.setRequestManager(requestManager);
}
return requestManager;
通过current.getLifecycle()将RequestManagerFragment的生命周期传给RequestManager,又把这个RequestManager设置进RequestManagerFragment,这边相当于是互相持有了.其实设置生命周期给RequestManager完全没有必要这么写,因为Current已经持有RequestManager了.
最终我们返回RequestManager,我们现在看RequestManager是什么?
RequestManager-非常重要
更精彩的来了!!!
看一下RequestManager代码
public class RequestManager implements LifecycleListener {
    private final Context context;
    private final Lifecycle lifecycle;
    private final RequestTracker requestTracker;
    private final Glide glide;
    private final OptionsApplier optionsApplier;
    private DefaultOptions options;

    ...
    this.glide = Glide.get(context);
    lifecycle.addListener(this);
    ...
    @Override
    public void onStart() {
        // onStart might not be called because this object may be created after the fragment/activity's onStart method.
        resumeRequests();
    }

    /**
     * Lifecycle callback that unregisters for connectivity events (if the android.permission.ACCESS_NETWORK_STATE
     * permission is present) and pauses in progress loads.
     */
    @Override
    public void onStop() {
        pauseRequests();
    }

    /**
     * Lifecycle callback that cancels all in progress requests and clears and recycles resources for all completed
     * requests.
     */
    @Override
    public void onDestroy() {
        requestTracker.clearRequests();
    }

}
我们得到几个有用信息,
implements LifecycleListener,实现了这个接口,我们上面还讲到观察者模式,在ActivityFragmentLifecycle里面,此时RequestManager拥有了生命周期的回调,我们从代码可以看到,它在每个生命周期里面进行了取消,暂停,恢复请求的操作.- 持有一个全局的
Glide变量,Glide类是单例的.我们看通过Glide.get(context);拿到Glide类.
我们知道,很多框架需要在Application里面初始化,因为肯定要持有Context,又不想绑定某个Activity的Context,因此用Application的Context.这就造成了要在Application里面初始化的结果.包括我的SherlockImageLoader也是这么写的.现在看样子需要改进了.
我们看看get方法.
    /**
     * Get the singleton.
     *
     * @return the singleton
     */
    public static Glide get(Context context) {
        if (glide == null) {
            synchronized (Glide.class) {
                if (glide == null) {
                    Context applicationContext = context.getApplicationContext();
                    List<GlideModule> modules = new ManifestParser(applicationContext).parse();

                    GlideBuilder builder = new GlideBuilder(applicationContext);
                    for (GlideModule module : modules) {
                        module.applyOptions(applicationContext, builder);
                    }
                    glide = builder.createGlide();
                    for (GlideModule module : modules) {
                        module.registerComponents(applicationContext, glide);
                    }
                }
            }
        }
        return glide;
    }
从上面可以看到,get时候传入context,但并不是每次传的context都会被用到的,只有第一次使用的时候这个Context会被用到,也只是用它来获取Application的Context. 然后利用Application的Context来惰性初始化我们的全局Glide对象.
好我们RequestManager先暂停一下,我们看with完了,我们拿到RequestManager后该干什么.
Glide.with(TodayFragment.this).load(gankDay.results.福利.get(0).getUrl())…
我们会调用load()方法,或者是fromUri(),loadFromMediaStore(),load(File file)..等多种重载.但是我们会得到一个新的对象叫DrawableTypeRequest,很明显,这是用来帮助我们初始化请求的类.我们去看看.
public class DrawableTypeRequest<ModelType> extends DrawableRequestBuilder<ModelType> implements DownloadOptions {
  public BitmapTypeRequest<ModelType> asBitmap() {
    return optionsApplier.apply(new BitmapTypeRequest<ModelType>(this, streamModelLoader,
            fileDescriptorModelLoader, optionsApplier));
  }
  @Override
  public DrawableRequestBuilder<ModelType> animate(ViewPropertyAnimation.Animator animator) {
      super.animate(animator);
      return this;
  }

  /**
   * {@inheritDoc}
   */
  @Override
  public DrawableRequestBuilder<ModelType> animate(int animationId) {
      super.animate(animationId);
      return this;
  }
  /**
   * {@inheritDoc}
   */
  @Override
  public DrawableRequestBuilder<ModelType> placeholder(int resourceId) {
      super.placeholder(resourceId);
      return this;
  }
}
果然是,是一个Builder,我们可以用来设置各种模式,各种情况.这个Builder非常的大.因为要考虑到全世界的需求啊.里面的动画和编解码等都是很多的,不过这些都是应付各种各样的业务.
我们可以看一下UML图就知道了.
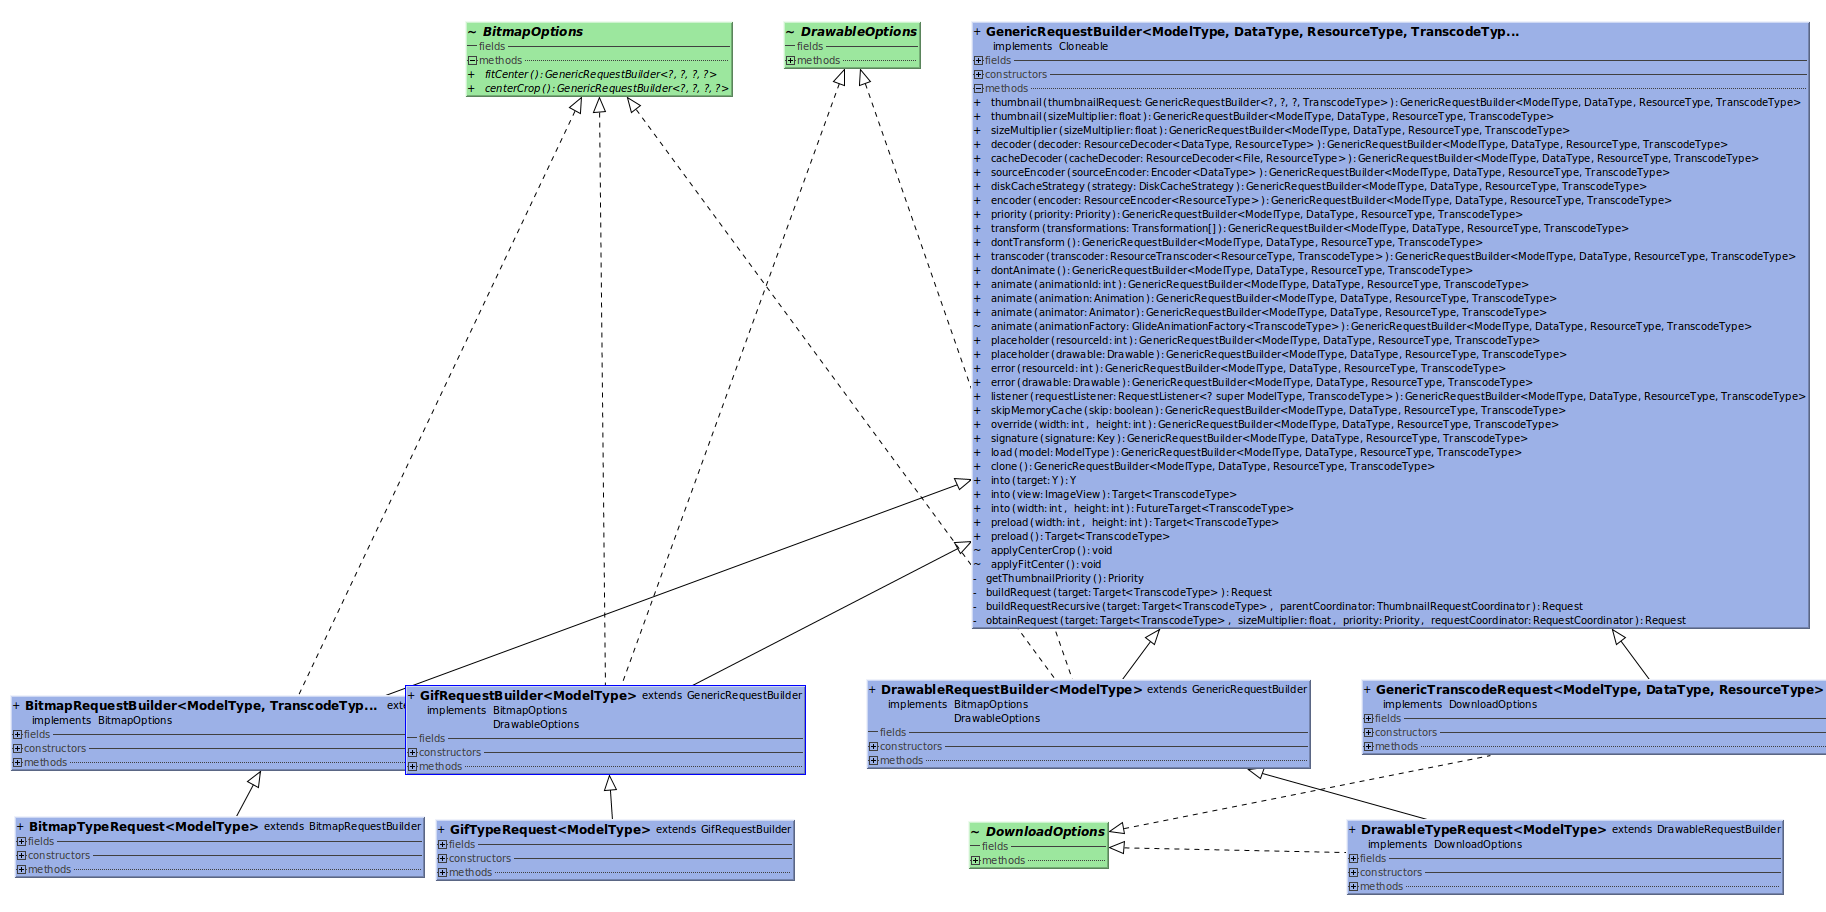
![]()
知道了是Builder后,我们直接跳去builder的into方法看.
into()
public Target<TranscodeType> into(ImageView view) {
    Util.assertMainThread();
    if (view == null) {
        throw new IllegalArgumentException("You must pass in a non null View");
    }

    if (!isTransformationSet && view.getScaleType() != null) {
        switch (view.getScaleType()) {
            case CENTER_CROP:
                applyCenterCrop();
                break;
            case FIT_CENTER:
            case FIT_START:
            case FIT_END:
                applyFitCenter();
                break;
            //$CASES-OMITTED$
            default:
                // Do nothing.
        }
    }

    return into(glide.buildImageViewTarget(view, transcodeClass));
}

public <Y extends Target<TranscodeType>> Y into(Y target) {
    Util.assertMainThread();
    if (target == null) {
        throw new IllegalArgumentException("You must pass in a non null Target");
    }
    if (!isModelSet) {
        throw new IllegalArgumentException("You must first set a model (try #load())");
    }

    Request previous = target.getRequest();

    if (previous != null) {
        previous.clear();
        requestTracker.removeRequest(previous);
        previous.recycle();
    }
    //创建请求对象
    Request request = buildRequest(target);
    target.setRequest(request);
    //将target加入lifecycle
    lifecycle.addListener(target);
    //执行请求
    requestTracker.runRequest(request);

    return target;
}
我们知道了三点:
- Util.assertMainThread();这里会检查是否主线程,不是的话会抛出异常,所以into方法必须在主线程中调用.
- 当你没有调用transform方法,并且你的ImageView设置了ScaleType,那么他会根据你的设置,对图片做处理(具体处理可以查看DrawableRequestBuilder的applyCenterCrop或者applyFitCenter方法,我们自己自定义BitmapTransformation也可以参考这里的处理).
- view在这里被封装成一个Target.
我们看看上面代码里面的buildRequest方法.
private Request obtainRequest(Target<TranscodeType> target, float sizeMultiplier, Priority priority,
        RequestCoordinator requestCoordinator) {
    return GenericRequest.obtain(
            loadProvider,
            model,
            signature,
            context,
            priority,
            target,
            sizeMultiplier,
            placeholderDrawable,
            placeholderId,
            errorPlaceholder,
            errorId,
            requestListener,
            requestCoordinator,
            glide.getEngine(),
            transformation,
            transcodeClass,
            isCacheable,
            animationFactory,
            overrideWidth,
            overrideHeight,
            diskCacheStrategy);
}
里面有一个享元模式,有点类似于Message.obtain一样,都是去生成Request,并且都是复用.
这是一个插曲,回到into()里面来,最后生成了Request后, 调用 requestTracker.runRequest(request);
/**
     * Starts tracking the given request.
     */
    public void runRequest(Request request) {
    //添加request对象到集合中
        requests.add(request);
        if (!isPaused) {
        //如果当前状态是非暂停的,调用begin方法发送请求
            request.begin();
        } else {
        //将请求加入到挂起的请求集合
            pendingRequests.add(request);
        }
    }
我们可以看到.将Request添加进一个set后,还是调用了Request的begin方法,这个Request是GenericRequest
我们进去看GenericRequest的begin方法
@Override
public void begin() {
    startTime = LogTime.getLogTime();
    if (model == null) {
        onException(null);
        return;
    }

    status = Status.WAITING_FOR_SIZE;
    if (Util.isValidDimensions(overrideWidth, overrideHeight)) {
        onSizeReady(overrideWidth, overrideHeight);
    } else {
        target.getSize(this);
    }

    if (!isComplete() && !isFailed() && canNotifyStatusChanged()) {
        target.onLoadStarted(getPlaceholderDrawable());
    }
    if (Log.isLoggable(TAG, Log.VERBOSE)) {
        logV("finished run method in " + LogTime.getElapsedMillis(startTime));
    }
}
在这边回调了target.onLoadStarted(getPlaceholderDrawable());方法,去设置占位图.这里的Target有很多种
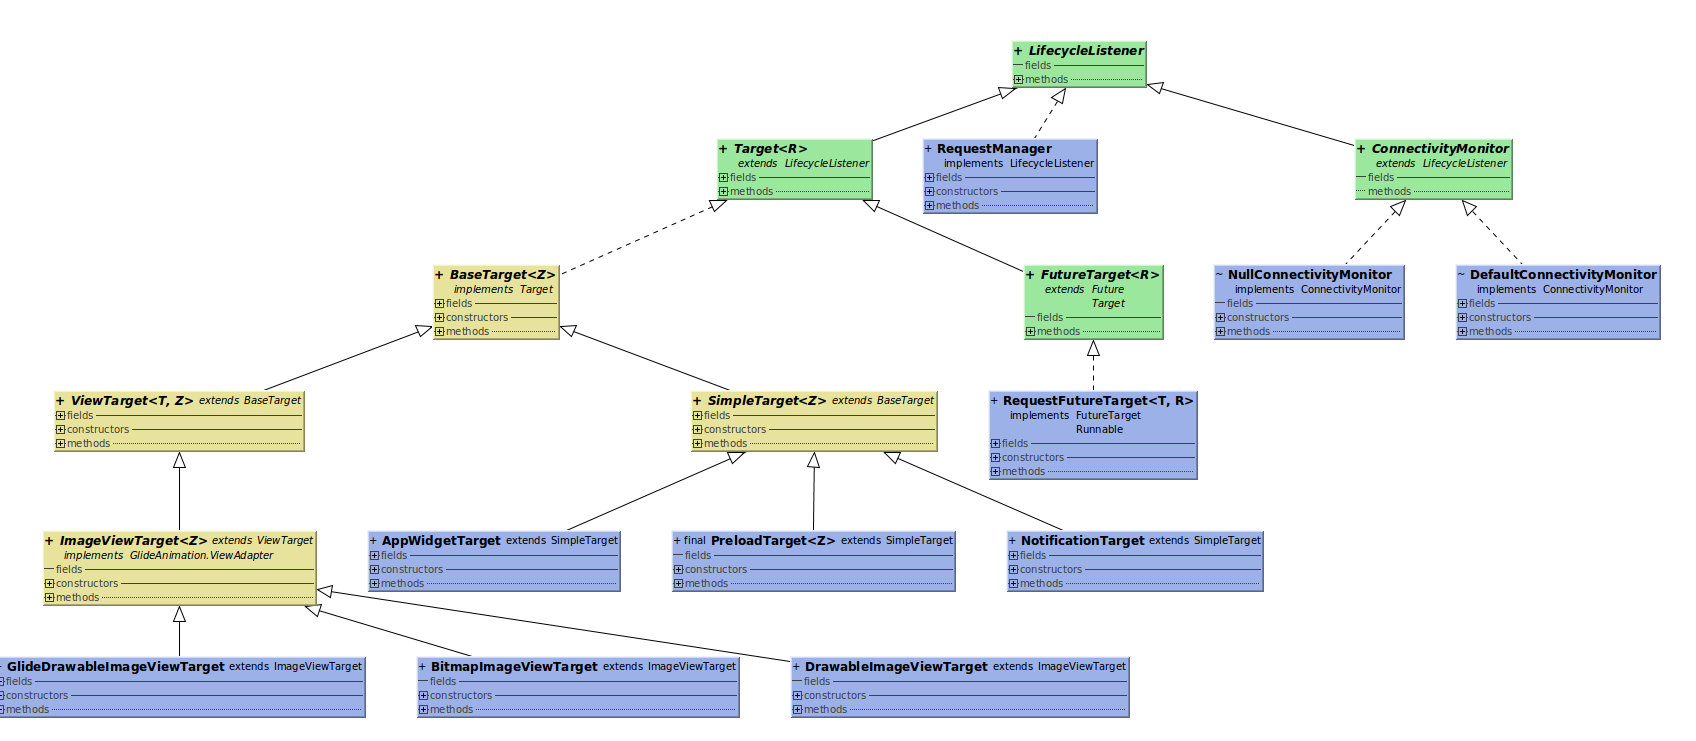
不过都是回调他们的生命周期onLoadStart了.
这里我们来注意几个细节,首先如果model等于null,model也就是我们在第二步load()方法中传入的图片URL地址,这个时候会调用onException()方法。如果你跟到onException()方法里面去看看,你会发现它最终会调用到一个setErrorPlaceholder()当中.就是加载错误图片
GenericRequest类中还有个重要方法,刚刚的begin方法里面会调用到.
我们看看代码.
/**
 * A callback method that should never be invoked directly.
 */
@Override
public void onSizeReady(int width, int height) {
    if (Log.isLoggable(TAG, Log.VERBOSE)) {
        logV("Got onSizeReady in " + LogTime.getElapsedMillis(startTime));
    }
    if (status != Status.WAITING_FOR_SIZE) {
        return;
    }
    status = Status.RUNNING;

    width = Math.round(sizeMultiplier * width);
    height = Math.round(sizeMultiplier * height);

    ModelLoader<A, T> modelLoader = loadProvider.getModelLoader();
    final DataFetcher<T> dataFetcher = modelLoader.getResourceFetcher(model, width, height);

    if (dataFetcher == null) {
        onException(new Exception("Got null fetcher from model loader"));
        return;
    }
    ResourceTranscoder<Z, R> transcoder = loadProvider.getTranscoder();
    if (Log.isLoggable(TAG, Log.VERBOSE)) {
        logV("finished setup for calling load in " + LogTime.getElapsedMillis(startTime));
    }
    loadedFromMemoryCache = true;
    loadStatus = engine.load(signature, width, height, dataFetcher, loadProvider, transformation, transcoder,
            priority, isMemoryCacheable, diskCacheStrategy, this);
    loadedFromMemoryCache = resource != null;
    if (Log.isLoggable(TAG, Log.VERBOSE)) {
        logV("finished onSizeReady in " + LogTime.getElapsedMillis(startTime));
    }
}
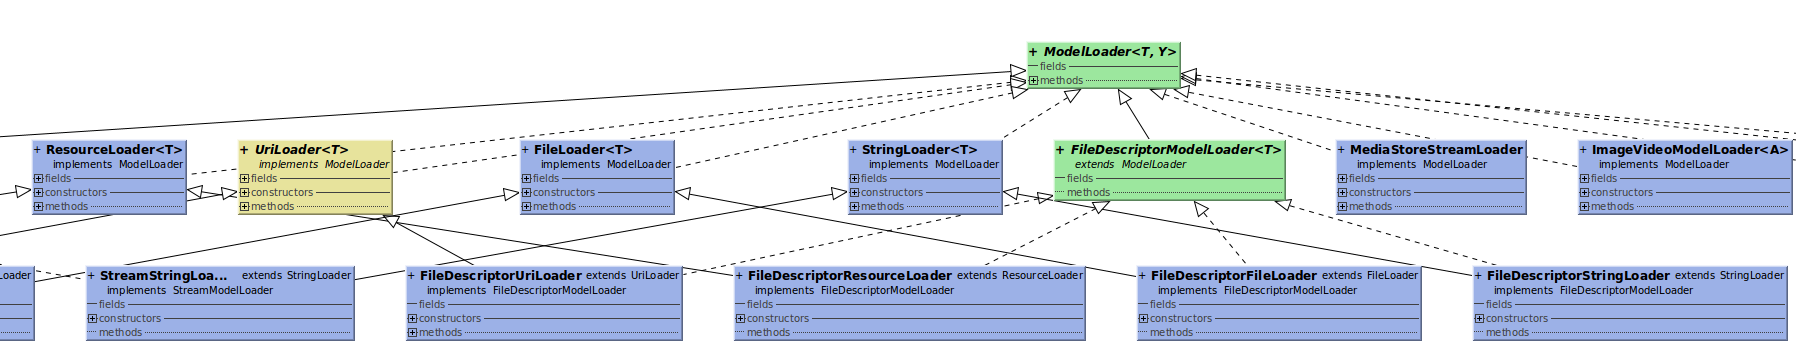
在上面我们看到了很多关键词Loader,ResourceTranscoder,loadProvider,loadedFromMemoryCache,这些不正是我们设计图片加载框架最核心的地方么,加载器,转码器,加载器管理器,缓存池都在此处有影子.
加载器,转码器等是怎么根据类型判断的我们可以跳过,加载器和转码器有很多种,又是一个大的抽象树.但是不是重点,我们看这些只要看其顶级接口就行了.
我们直接去看engin怎么load的.
public <T, Z, R> LoadStatus load(Key signature, int width, int height, DataFetcher<T> fetcher,
        DataLoadProvider<T, Z> loadProvider, Transformation<Z> transformation, ResourceTranscoder<Z, R> transcoder,
        Priority priority, boolean isMemoryCacheable, DiskCacheStrategy diskCacheStrategy, ResourceCallback cb) {
    Util.assertMainThread();
    long startTime = LogTime.getLogTime();

    final String id = fetcher.getId();
    EngineKey key = keyFactory.buildKey(id, signature, width, height, loadProvider.getCacheDecoder(),
            loadProvider.getSourceDecoder(), transformation, loadProvider.getEncoder(),
            transcoder, loadProvider.getSourceEncoder());
    // 从缓存加载
    EngineResource<?> cached = loadFromCache(key, isMemoryCacheable);
    if (cached != null) {
        // 获取数据成功,会回调target的onResourceReady() 结束
        cb.onResourceReady(cached);
        if (Log.isLoggable(TAG, Log.VERBOSE)) {
            logWithTimeAndKey("Loaded resource from cache", startTime, key);
        }
        return null;
    }
    // 尝试从活动Resources 中获取,它表示的是当前正在使用的Resources,与内存缓存不同之处是clear缓存时不会clear它。
    EngineResource<?> active = loadFromActiveResources(key, isMemoryCacheable);
    if (active != null) {
        // 成功 再见
        cb.onResourceReady(active);
        if (Log.isLoggable(TAG, Log.VERBOSE)) {
            logWithTimeAndKey("Loaded resource from active resources", startTime, key);
        }
        return null;
    }
    //判断jobs中是否已经存在任务,如果存在说明任务之前已经提交了
    EngineJob current = jobs.get(key);
    if (current != null) {
        current.addCallback(cb);
        if (Log.isLoggable(TAG, Log.VERBOSE)) {
            logWithTimeAndKey("Added to existing load", startTime, key);
        }
        return new LoadStatus(cb, current);
    }
    //缓存没有获取到,创建EngineJob 对象
    EngineJob engineJob = engineJobFactory.build(key, isMemoryCacheable);
    DecodeJob<T, Z, R> decodeJob = new DecodeJob<T, Z, R>(key, width, height, fetcher, loadProvider, transformation,
            transcoder, diskCacheProvider, diskCacheStrategy, priority);
    EngineRunnable runnable = new EngineRunnable(engineJob, decodeJob, priority);
    jobs.put(key, engineJob);
    engineJob.addCallback(cb);
    engineJob.start(runnable);

    if (Log.isLoggable(TAG, Log.VERBOSE)) {
        logWithTimeAndKey("Started new load", startTime, key);
    }
    return new LoadStatus(cb, engineJob);
}
上面步骤为:
- 先根据调用loadFromCache从内存加载,成功获取后直接回调返回.失败继续
- 尝试从活动Resources 中获取,成功返回,失败继续
- 去判断job是否已经存在,存在了就返回新的状态,没有则继续
- 创建job,创建decodejob,创建runnable,开启job.EngineRunnable的run()方法在子线程当中执行了
现在我们去看EngineRunnable到底干了啥.
@Override
public void run() {
    if (isCancelled) {
        return;
    }

    Exception exception = null;
    Resource<?> resource = null;
    try {
        resource = decode();
    } catch (Exception e) {
        if (Log.isLoggable(TAG, Log.VERBOSE)) {
            Log.v(TAG, "Exception decoding", e);
        }
        exception = e;
    }

    if (isCancelled) {
        if (resource != null) {
            resource.recycle();
        }
        return;
    }

    if (resource == null) {
        onLoadFailed(exception);
    } else {
        onLoadComplete(resource);
    }
}
妈的好像没干什么事情,就主要调了decode()方法啊,之后都回调成功或者失败的结果了.说明肯定就在decode()方法里面.
private Resource<?> decode() throws Exception {
    if (isDecodingFromCache()) {
        return decodeFromCache();
    } else {
        return decodeFromSource();
    }
}

private Resource<?> decodeFromCache() throws Exception {
    Resource<?> result = null;
    try {
        result = decodeJob.decodeResultFromCache();
    } catch (Exception e) {
        if (Log.isLoggable(TAG, Log.DEBUG)) {
            Log.d(TAG, "Exception decoding result from cache: " + e);
        }
    }

    if (result == null) {
        result = decodeJob.decodeSourceFromCache();
    }
    return result;
}

private Resource<?> decodeFromSource() throws Exception {
    return decodeJob.decodeFromSource();
}
上面一看,decode()又去调用decodeFromCache()或decodeFromSource()了.抓头,这么快就decode了?source在哪来的啊,我们直接点进去看,我们传入的是url的时候,目前而言,图片还没下载下来呢.
public Resource<Z> decodeFromSource() throws Exception {
    Resource<T> decoded = decodeSource();
    return transformEncodeAndTranscode(decoded);
}

private Resource<T> decodeSource() throws Exception {
    Resource<T> decoded = null;
    try {
        long startTime = LogTime.getLogTime();
        final A data = fetcher.loadData(priority);
        if (Log.isLoggable(TAG, Log.VERBOSE)) {
            logWithTimeAndKey("Fetched data", startTime);
        }
        if (isCancelled) {
            return null;
        }
        decoded = decodeFromSourceData(data);
    } finally {
        fetcher.cleanup();
    }
    return decoded;
}
有一丝希望,我们看到了原来这里面不是decode我们的图片.而且是decode我们的url资源. 看到了关键词fetcher.loadData(priority);
因为事先就用uml生成工具看了Glide的uml图,fetcher可是担任load任务的人.
我们看一下fetcher的uml
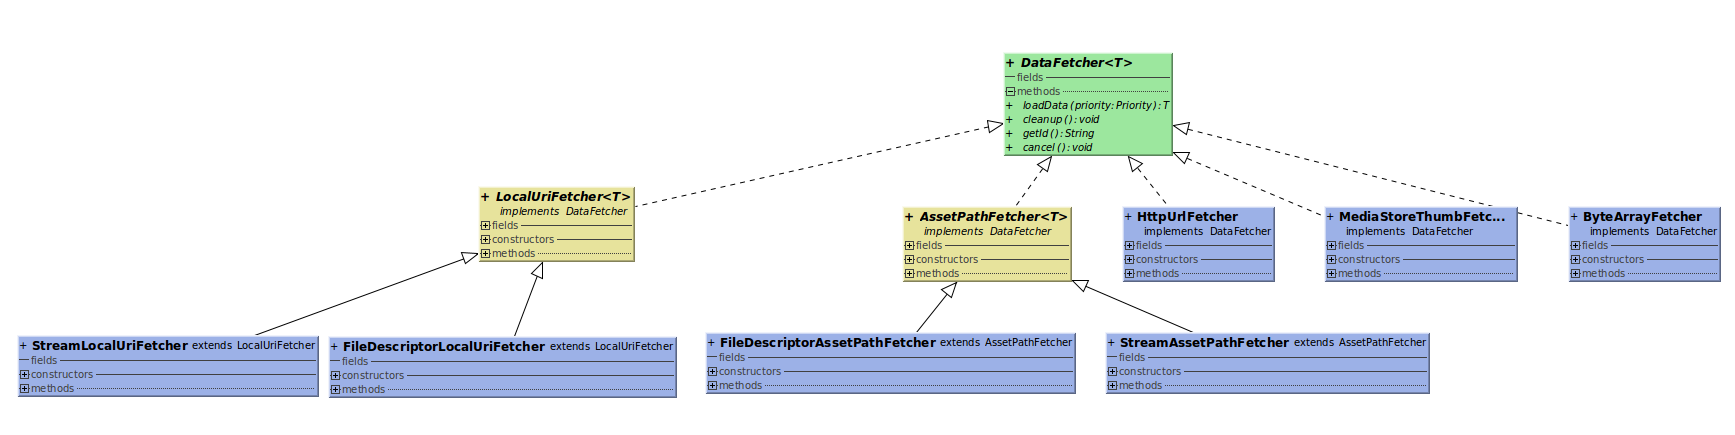
里面可是有加载方法的.我们去看一个Fetcher,就使用率最高的HttpUrlFetcher吧.
    public InputStream loadData(Priority priority) throws Exception {
        return this.loadDataWithRedirects(this.glideUrl.toURL(), 0, (URL)null);
    }

    private InputStream loadDataWithRedirects(URL url, int redirects, URL lastUrl) throws IOException {
        if(redirects >= 5) {
            throw new IOException("Too many (> 5) redirects!");
        } else {
            try {
                if(lastUrl != null && url.toURI().equals(lastUrl.toURI())) {
                    throw new IOException("In re-direct loop");
                }
            } catch (URISyntaxException var7) {
                ;
            }

            this.urlConnection = this.connectionFactory.build(url);
            this.urlConnection.setConnectTimeout(2500);
            this.urlConnection.setReadTimeout(2500);
            this.urlConnection.setUseCaches(false);
            this.urlConnection.setDoInput(true);
            this.urlConnection.connect();
            if(this.isCancelled) {
                return null;
            } else {
                int statusCode = this.urlConnection.getResponseCode();
                if(statusCode / 100 == 2) {
                    this.stream = this.urlConnection.getInputStream();
                    return this.stream;
                } else if(statusCode / 100 == 3) {
                    String redirectUrlString = this.urlConnection.getHeaderField("Location");
                    if(TextUtils.isEmpty(redirectUrlString)) {
                        throw new IOException("Received empty or null redirect url");
                    } else {
                        URL redirectUrl = new URL(url, redirectUrlString);
                        return this.loadDataWithRedirects(redirectUrl, redirects + 1, url);
                    }
                } else if(statusCode == -1) {
                    throw new IOException("Unable to retrieve response code from HttpUrlConnection.");
                } else {
                    throw new IOException("Request failed " + statusCode + ": " + this.urlConnection.getResponseMessage());
                }
            }
        }
    }
不出所料,在这里加载url,从网络获取资源. 感恩,我们终于找到调用urlConnection的源码了!可以看到我们拿到了网络请求的InputStream,
对应于HttpUrlFetcher的是ImageVideoBitmapDecoder , 它是接收InputStream,因为这个InputStream类型对于这两货来说都是T类型.相对应的.
代码如下,可以看到,我们的通过decode,成功拿到bitmap.刚刚的InputStream已经被封装到ImageVideoWrapper source里面了.通过InputStream is = source.getStream();拿到.
public class ImageVideoBitmapDecoder implements ResourceDecoder<ImageVideoWrapper, Bitmap> {
    private static final String TAG = "ImageVideoDecoder";
    private final ResourceDecoder<InputStream, Bitmap> streamDecoder;
    private final ResourceDecoder<ParcelFileDescriptor, Bitmap> fileDescriptorDecoder;

    public ImageVideoBitmapDecoder(ResourceDecoder<InputStream, Bitmap> streamDecoder,
            ResourceDecoder<ParcelFileDescriptor, Bitmap> fileDescriptorDecoder) {
        this.streamDecoder = streamDecoder;
        this.fileDescriptorDecoder = fileDescriptorDecoder;
    }

    @SuppressWarnings("resource")
    // @see ResourceDecoder.decode
    @Override
    public Resource<Bitmap> decode(ImageVideoWrapper source, int width, int height) throws IOException {
        Resource<Bitmap> result = null;
        InputStream is = source.getStream();
        if (is != null) {
            try {
                result = streamDecoder.decode(is, width, height);
            } catch (IOException e) {
                if (Log.isLoggable(TAG, Log.VERBOSE)) {
                    Log.v(TAG, "Failed to load image from stream, trying FileDescriptor", e);
                }
            }
        }

        if (result == null) {
            ParcelFileDescriptor fileDescriptor = source.getFileDescriptor();
            if (fileDescriptor != null) {
                result = fileDescriptorDecoder.decode(fileDescriptor, width, height);
            }
        }
        return result;
    }

    @Override
    public String getId() {
        return "ImageVideoBitmapDecoder.com.bumptech.glide.load.resource.bitmap";
    }
}
都拿到了bitmap了,下面水到渠成了
哎呀我去,太长了,写了三小时,好不容易拿到bitmap了.接下来就是如何显示如何回调了. 太长了.以后有机会再分析.
本文作者:Anderson/Jerey_Jobs
博客地址 : http://jerey.cn/
简书地址 : Anderson大码渣
github地址 : https://github.com/Jerey-Jobs